Showing posts with label Word Processing. Show all posts

Monday, February 08, 2010

Styles and Word Processing

At the January 2010 Broward Personal Computer Association, Inc. (BPCA) general meeting Q&A session the subject of using styles in word processing came up.

The actual question was:In Microsoft Word, how do I stop it from capitalizing the beginning of each line?
 
In answer to the question, it was suggested that the reason for capitalization of the first letter of the new line is that she is using the Enter key as a carriage return, just like she would if using a typewriter. Upon opening a session of Microsoft Word on one laptop, and one of OpenOffice.org on another laptop, a few lines were typed in each using the Enter key as a carriage return, and another few paragraphs only pressing the Enter key as a carriage return at the end of the paragraph. Sure enough, once we turned on Show/Hide Paragraph Marks it showed that was exactly what was happening.

Now the thing is how to get her to stop using her word processor (it doesn't really matter which one, as long as it supports styles) like a typewriter, and use it as it is intended, a way to process words.

Suggestion

Here is a suggestion, as well as some links to information regarding using styles.

Instead of worrying about what the document looks like, try using a plain text editor, such as Notepad, to just put down all your thoughts. Just write until you have everything out of your head and into the document. Once you have all this, I call it my very rough draft, copy and paste it into your word processor, and now apply your formatting (bold, italic, etc.), rearrange and edit your sentences and paragraphs, and apply your styles to make it look pretty.

Links

Some Links to check out regarding styles (mostly for Microsoft Word, but with minor adjustments should work with any word processor or desktop publisher that supports styles):

Ten Things Every Microsoft Word User Should Know
http://generaldisarray.wordpress.com/2006/04/14/ten-things-every-microsoft-word-user-should-know/

delicious.com search for microsoft word styles result:
http://delicious.com/search?p=microsoft+word+styles&chk=&fr=del_icio_us&lc=1&atags=&rtags=&context=all||

Results for style search at Tips.net:
http://www.tips.net/results.html?cx=003792548944738135704%3Am_k9gka3qx0&cof=FORID%3A11&q=styles&sa.x=0&sa.y=0&sa=Search&siteurl=www.tips.net%2F#722

Results for a Google search of why use styles in word:
http://www.google.com/search?q=why+use+styles+in+word&ie=utf-8&oe=utf-8&aq=t&rls=org.mozilla:en-US:official&client=firefox-a&safe=active

**********

Photo courtesy of: http://www.imageafter.com/image.php?image=b12objects052.jpg

Tuesday, March 20, 2007

Lifehacker Post - Make Microsoft Word less annoying

There are quite a few very good tips in the posting, linked to in the above title, regarding customizing Microsoft Word (2003 specifically) to make it easier to use only the features that are important to the way you work.

Those of you who have attended any of the BPCA Word Processing SIG meetings, know that I have been advocating similar measures for all the various word processors and even most other applications.

Check this out and let me know what you think.

Tuesday, November 21, 2006

MS Word - Adjusting a Form Template

Just got back to having computer access and received a call from my wife. A form I had made up for her, using Microsoft Word 2003, needed to be adjusted for some new product and she had ten orders to type up and run on the dot matrix printer with the new information.


The problem was that she nows very little about how to use Microsoft Word and needed it down right away to keep from having to do everything by hand.


Luckily, I was able to walk her through sending me a copy of the DOT (Word Document Template (Microsoft)) file, via email. Once I saved that DOT file to my hard drive, I was able to open it, adjust it and email it back to her.


To make the adjustments in MS Word 2003, I did the following:


  • Right clicked on the DOT file.

  • Selected Open from the drop down menu. (If you just double click a DOT file to open it, you will get a new blank document instead of opening the DOT itself.)

  • Made the Forms Toolbar visible:


    • View on the MS Word menu bar

    • Select Toolbars

    • Click on Forms


  • Clicked on the Protect Forms icon, it looks like a little padlock, to unlock the form.

  • Replaced three text items with Text Form Fields, with the same formatting as the replaced text; also changed text in another area, but straight text not a Text Form Field.

  • Clicked on the Protect Forms icon again to lock the form again.

  • Hid the Forms Toolbar again.


    • View on the MS Word menu bar

    • Select Toolbars

    • Click on Forms


  • Saved the DOT file with a new name, reflecting today's date and the new function.


Once the form was adjusted, I emailed her the new DOT file and walked her through how to save it in a folder in My Documents containing forms of the same type and then walked her through creating a shortcut for this one to the desktop.


The whole process took about a half hour and saved a lot of work on her part. Now she just needs to double click on the shortcut item, fill in the information that changes, print the multi-part form on the dot matrix printer, sign it and move on to the next order of business.


She has some other forms, that are not multi-part, but those I have done for her in PDF (Acrobat Portable Document Format) and have to do those differently as you must have the complete Acrobat application to create or adjust them.


If you have special forms or are interested in forms, leave a comment and let me know how you handle problems.


As Thursday is Thanksgiving Day, there will be no posting. I will be spending time with my family, as we all should, and will post Friday this week instead.


Have a great Thanksgiving!!

Tuesday, August 15, 2006

Word Processing - Disable Auto Bulleted And Or Numbered Lists

Word automatically formating bulleted and numbered lists, is very aggravating to me. I turn this function off for that reason.


The following instructions will show you how to turn this off. Of course, if you want to put up with this in the future, just reverse the process:


  • Select AutoCorrect Options from the Tools menu.

  • Click the AutoFormat As You Type tab.

  • Deselect Automatic bulleted lists.

  • Deselect Automatic numbered lists.

  • Click OK.


There are ways to get rid of the automatically bulleted or numbered lists, but I prefer to turn them off all together, rather than having to stop writing to fix the problem.


To turn this function off in OpenOffice the instructions are similar, but not entirely the same:


  • Select AutoCorrect from the drop down Tools menu.

  • Select the Options Tab.

  • Uncheck Apply numbering - symbol:

  • Click OK.


OpenOffice does not give you the option to have one or the other functioning, both bulleted and numbering is either on or off.


This will be one of the topics of tonight's BPCA Word Processing SIG (Special Interest Group) session.

Thursday, July 13, 2006

Word - Random Text Generation

I sometimes have to generate some random text to test how a new layout looks for a newsletter or website. I know there are easier, and probably better ways to do it but, here are two methods I have used in Microsoft Word.


The first is to simply locate a document and copy what looks like the right amount of text and paste it into the new layout as plain text.


The second method I use is to randomly generate a number of paragraphs in Word and then copy them and paste them into the new layout as plain text.


To do the generation of random text paragraphs in Word:


  • Create a new blank document.

  • Type =rand(#) [insert 1 for 1 paragraph, 5 for five paragraphs, etc. in the place of #, inside the parentheses].

  • Press enter.


This will insert the following paragraph the specified number of times:


"The quick brown fox jumps over the lazy dog. The quick brown fox jumps over the lazy dog. The quick brown fox jumps over the lazy dog. The quick brown fox jumps over the lazy dog. The quick brown fox jumps over the lazy dog."


This is another of those little things, that I seldom think about but, have been asked by others "How do you do that?".

Monday, July 03, 2006

Plain Text Paste

I have been getting a lot of complaints regarding my admonition to copy and paste text from the web to keep it for reference.

It seems that many of those who have tried doing this do not realize that if you do a straight copy and paste to a word processor, the formatting is also pasted.

This is my fault, as I tend to think everyone works the same as I do.

To paste the text with no formatting, in most applications, select Paste Special from the Edit or Insert menu, depending upon the application and then select either Plain text or Unformatted text, again depending upon the application.

If you somehow have a word processor which does not enable you to do a Paste Special, another way around this is to use a text only editor such as Windows Notepad as the place you safe the text.

I have just been so used to using Paste Special with Word, Publisher, email, etc., that I thought everyone knew to do it that way.

Remember, if you do not understand something in one of my posts or things do not work the way I describe, just let me know and I will research it and get back with you. It is probably me not being clear in the way I did the posting.

Happy 4th!!!!

Tuesday, May 23, 2006

Manual Line Breaks

This tip applies to MS Word 97 and above, it is possible it works in earlier editions but, I have no experience with them. This should also work in just about any word processor, but you will have to check for yourself.


When you get to the end of a line of text, you can start a new paragraph by pressing the Shift and Enter keys simultaneously. This will insert a manua line break.


The use of a manual line break comes in very handy when dealing with numbered lists. When you want to start a new paragraph in a numbered list without getting a new line number, use the manual break.


Another place to use the manual break, rather than start a new paragraph, is in any place set up as a "hanging" paragraph, such as cc: lines and references.


Try using the manual line break. Once you get used to it, you will find yourself using it frequently.


Let me know if there are any more applications of the manual break that help you in your word processing.

Friday, May 12, 2006

Posting Delay

I was unable to have any computer access yesterday 11MAY06 and only minimal access today.

Due to this, I will not be posting again until Tuesday 17MAY06.

I apologize to any regular visitors and promise to try to give advance notice of any future posting delays.

My 09MAY06 post "Displaying and Printing Microsoft Word Paragraph Styles" has generated some interest in the generic subject of Word Processing. I am thinking of starting a separate blog on the subject if there is enough interest.

If this is started, my plan is to start with:

  • How to design a document.
  • How to enter the text correctly, not like using a typewriter.
  • How to format the document. (Using styles, if the word processing software supports it and most mid-high level word processors do.)
  • How to use tables and when. (Again if supported).
I am open to suggestions as to where to go from these starting points and how deeply I should delve into each subject.

Email me at wordproc@earthlink.net, with a subject line starting with Steve Word.

(My filter will be set up to only accept email with Steve Word as the start of the subject line.)

Tuesday, May 09, 2006

Displaying and Printing Microsoft Word Paragraph Styles

While fooling around in Microsoft Word to work up something for the Broward Personal Computer Association, Inc. (BPCA) Word Processing Special Interest Group (SIG), I ran across how to display paragraph styles and how to print a listing of paragraph styles with their formatting.

Displaying

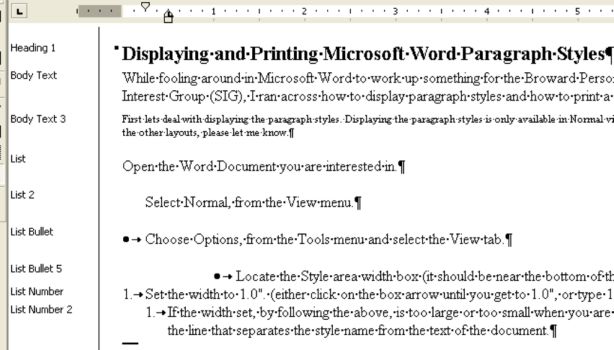
First lets deal with displaying the paragraph styles. Displaying the paragraph styles is only available in Normal view, as far as I can tell. I did try the other layouts. If anyone knows of a way to do the same in the other layouts, please let me know.

  • Open the Word Document you are interested in.

  • Select Normal, from the View menu.

  • Choose Options, from the Tools menu and select the View tab.

  • Locate the Style area width box (it should be near the bottom of the tab).

  • Set the width to 1.0". (either click on the box arrow until you get to 1.0", or type 1.0" in the box directly).


  • Result Sample


  • If the width set, by following the above, is too large or too small when you are viewing the paragraph styles, it can be adjusted by clicking and dragging the line that separates the style name from the text of the document.
  • Printing

    Sometimes it is useful to print out the paragraph styles and their formatting. I frequently do this when I am trying to set up a template for a project, so that I can consistently apply paragraph formatting throughout the document.

    Typically, I use very few styles but, the styles I do use are used consistently.

    You can print out a list of the styles used in a doument by selecting Styles in the Print What section of the Print Dialog Box:


    Print What

    In my opinion, the use of styles is very important. Styles promote consistency and make documents much easier to edit.

    More on using Styles to follow in future postings.