Wednesday, May 31, 2006

Computer On or Off?

As there have been numerous thunderstorms in the last few days, here in South Florida, the question has again been posed:

Should I leave my computer on and hooked up all the time or turn it off and unplug everything?

This is really a matter of personal preference and ability to accept the risk of frying your system.

Personally, when I am not actually using my PC for any length of time, regardless of the presence of thunderstorms, everything is turned off and unplugged, including any network cables and phone lines. I can not accept the risk of losing my equpment and my data.

Furthermore, if there are thunderstorms in the area after I start using my PC, I promptly shut everything down and unplug everything also.

I back up my data quite frequently but, even so I don't want to take a chance and have to rebuild everything with a new set up. It is a lot of work to get things working the way I like them to and I am not willing to risk the lost time.

On another note, this posting is a day late because, I am currently on vacation and do not have ready access. If possible, I will post as closely as possible to my regular Tuesday and Thursday postings but, it is possible I will not be able to post again until the 13th of June. Until then I will attempt to at least check for comments or questions and answer as quickly as possible.

Thursday, May 25, 2006

Display Properties Shortcut

Those who regularly attend the BPCA SIG and General meeting, know that I am always changing something in the display properties to get the monitor and projector playing nicely with each other.


I have finally gotten smart and made a shortcut directly to the Display Properties of my various Windows based computers, instead of continually navigating from Start to Contol Panel, etc.


I created the shortcut by following these steps:


  • Left click the Start Button

  • Left click Control Panel

  • Right click Display

  • Select Create Shortcut

  • Click on Yes, when a dialog box comes up asking if you want the shortcut to be placed on the desktop


For even easier access, move the shortcut to the Quick Launch toolbar, if you are using that.


Now I have easy access to my display settings.

Tuesday, May 23, 2006

Manual Line Breaks

This tip applies to MS Word 97 and above, it is possible it works in earlier editions but, I have no experience with them. This should also work in just about any word processor, but you will have to check for yourself.


When you get to the end of a line of text, you can start a new paragraph by pressing the Shift and Enter keys simultaneously. This will insert a manua line break.


The use of a manual line break comes in very handy when dealing with numbered lists. When you want to start a new paragraph in a numbered list without getting a new line number, use the manual break.


Another place to use the manual break, rather than start a new paragraph, is in any place set up as a "hanging" paragraph, such as cc: lines and references.


Try using the manual line break. Once you get used to it, you will find yourself using it frequently.


Let me know if there are any more applications of the manual break that help you in your word processing.

Thursday, May 18, 2006

Screen Captures

I have had a few people ask me what is the key that says Prt Scrn for? Well, in the olden days it used to be that you would press that key and whatever was on the screen would be printed.


Now it is used to capture a picture of the screen and sends it to the clipboard. There are two options for the capture:

  1. To capture everything on the screen, press the Prt Scrn key.
  2. To capture only the currently active window, press Alt and Prt Scrn keys at the same time.

You will have to save your capture to a graphics program to save it.

XP's built in Paint or, if it is installed, Microsoft Photo Editor would be the cheapest means of accomplishing the save. You could also use any program capable of pasting your screen capture and saving it such as Paint Shop Pro, IrfanView, etc.


There are more capable screen capture programs available, both free and paid, with a lot more options. Here is a Google search I just did: http://snipurl.com/scrncap


I use Gadwin PrintScreen 2.6, the latest release, I believe it is 3.1, is available at gadwin.com and is a freeware product.

Tuesday, May 16, 2006

Setting up a Mailto Link

I have been asked how I created the mailto link in my 12MAY06 "Posting Delay" post.


This is really simple to do:


To write an email link just create an anchor link like you would normally, but instead of http:// write mailto: and then your email address.


If you want to send to multiple people, separate the email addresses with a comma:


mailto:email@address1.com,email@address2.com


Use a question mark after the final "To" email address to indicate you want more than just a "To" line. Then you specify what other elements you would like:

  • cc - to send a carbon copy
  • bcc - to send a blind carbon copy
  • subject - for the subject line

You treat the elements as name=value pairs.

To add multiple elements, separate the second and subsequent elements with an ampersand (&).
mailto:toaddress?cc=ccaddress&bcc=bccaddress&subject=Whatever


If I substituted steve@steve.com for toaddress; you@you.com for ccaddress; someone@someone.com for bccaddress and An Email To Steve for Whatever, the result would be a blank email, with the field entries below:


  • To: steve@steve.com
  • CC: you@you.com
  • BCC: someone@someone.com
  • Subject: An Email To Steve


Note: You might end up with a lot of SPAM, using the mailto, due to webbot scanning.

Friday, May 12, 2006

Posting Delay

I was unable to have any computer access yesterday 11MAY06 and only minimal access today.

Due to this, I will not be posting again until Tuesday 17MAY06.

I apologize to any regular visitors and promise to try to give advance notice of any future posting delays.

My 09MAY06 post "Displaying and Printing Microsoft Word Paragraph Styles" has generated some interest in the generic subject of Word Processing. I am thinking of starting a separate blog on the subject if there is enough interest.

If this is started, my plan is to start with:

  • How to design a document.
  • How to enter the text correctly, not like using a typewriter.
  • How to format the document. (Using styles, if the word processing software supports it and most mid-high level word processors do.)
  • How to use tables and when. (Again if supported).
I am open to suggestions as to where to go from these starting points and how deeply I should delve into each subject.

Email me at wordproc@earthlink.net, with a subject line starting with Steve Word.

(My filter will be set up to only accept email with Steve Word as the start of the subject line.)

Tuesday, May 09, 2006

Displaying and Printing Microsoft Word Paragraph Styles

While fooling around in Microsoft Word to work up something for the Broward Personal Computer Association, Inc. (BPCA) Word Processing Special Interest Group (SIG), I ran across how to display paragraph styles and how to print a listing of paragraph styles with their formatting.

Displaying

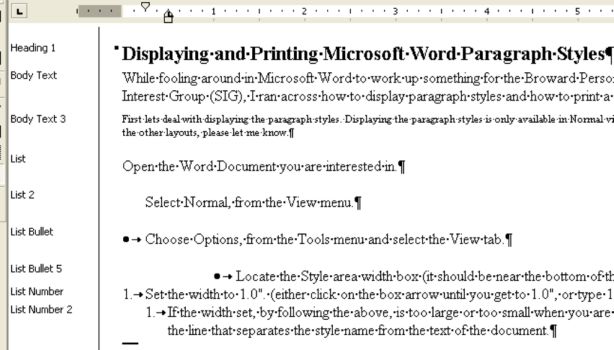
First lets deal with displaying the paragraph styles. Displaying the paragraph styles is only available in Normal view, as far as I can tell. I did try the other layouts. If anyone knows of a way to do the same in the other layouts, please let me know.

  • Open the Word Document you are interested in.

  • Select Normal, from the View menu.

  • Choose Options, from the Tools menu and select the View tab.

  • Locate the Style area width box (it should be near the bottom of the tab).

  • Set the width to 1.0". (either click on the box arrow until you get to 1.0", or type 1.0" in the box directly).


  • Result Sample


  • If the width set, by following the above, is too large or too small when you are viewing the paragraph styles, it can be adjusted by clicking and dragging the line that separates the style name from the text of the document.
  • Printing

    Sometimes it is useful to print out the paragraph styles and their formatting. I frequently do this when I am trying to set up a template for a project, so that I can consistently apply paragraph formatting throughout the document.

    Typically, I use very few styles but, the styles I do use are used consistently.

    You can print out a list of the styles used in a doument by selecting Styles in the Print What section of the Print Dialog Box:


    Print What

    In my opinion, the use of styles is very important. Styles promote consistency and make documents much easier to edit.

    More on using Styles to follow in future postings.

    Thursday, May 04, 2006

    Organizing Your PC Part 2

    As you know from Organizing Your PC Part 1, I like to have all the screen space possible available. To further do this I utilize the Quick Launch Toolbar, the Taskbar and the Desktop Toolbar. Using these makes everything I need readily available but, does not use up my screen real estate. These areas are shown in the image below:


    I will just give you a brief description of these areas at this time, and will go more in depth about how I got them the way they are in subsequent posts in this series.


    The Quick Launch Toolbar contains all the items I regularly use and need accessible. Not all the icons shown on the Quick Launch Toolbar are standard from Windows, some I have changed to reflect something of significance to me.


    The Taskbar shows me the Windows I currently have open, both minimized and maximized. I don't need that much space and will explain why later on.


    The Desktop Toolbar contains all the items on that are on my desktop , which are hidden from view, as explained in Part 1 of the series. I have it shrunk down as far as it can go but, I can still access everything by clicking on the double right facing chevrons (>>).

    More on each of these in the next installment of the series.


    As an update on my hurricane shutters, they are now telling me that they should be installed June 9th. That should work out well.

    Tuesday, May 02, 2006

    C:\BPCA News and Recovering Missing Toolbars

    First of all the May 2006 edition of C:\BPCA News has been sent out.


    It is also available in PDF format at http://snipurl.com/BPCA_News


    Secondly, as I was writing this entry, the man from the shutter company arrived to make the final measurements for the hurricane shutters I have ordered.


    The day of Hurricane Wilma is when they were first supposed to come out and give me an estimate. Of course, that did not happen. It was November before they could take the initial measurements and then it took until late December to get the architecural approval from the condo association.


    Luckily, the price has stayed the same, but with the shortage of materials and labor, the last time I talked to the company they thought we were looking at sometime in the late fall for installation.


    Hopefully, with the final measurements now taken so that they can be manufactured, my shutters can be installed prior or right at the beginning of this year's hurricane season. Hurray!!!!


    Lastly, my wife called me all in a panic yesterday because she could not see the toolbar in Outlook that has the icons for creating a new message, printing a message, etc.


    She thought she had totally messed up the company computer.


    I calmed her down and told her it is not a big deal, she must have just slipped with the mouse and turned off the toolbar.


    Sure enough, I told her to look at the menu bar, find where it says View, left click on it, then left click on Toolbars, and then make sure that the Standard toolbar has a check next to it. Mission accomplished.


    In most cases, if a toolbar is missing, visiting the View menu and experimenting with turning various toolbars on and off should recover it for you. You might even run across a useful toolbar you didn't even know existed because it wasn't turned on by default.


    Most of the newer software has a lot of optional toolbars, that can be helpful, once you know about them.